
How to Start a One-Jar Ferment in a Small Kitchen
A small kitchen teaches you quickly. Every jar, bowl, and pan has to earn its place. If something needs three shelves, six tools, and a new routine to maintain it, it probably will not last long in real life.
My kitchen is small and I don’t have enough storage space. So sometimes my counter has to be used for storing things I use every day. I don’t have room for a large fermenting project—but that doesn’t stop me from fermenting something.
Fermentation does not need to become a huge project. You can start with one jar, one vegetable, salt, and a few minutes at the counter. That is enough to learn the rhythm: cut, salt, pack, wait, taste, eat.

A one-jar ferment gives you the skill of preservation without requiring a pantry, a cellar, or a full weekend.
What a One-Jar Ferment Actually Is
A one-jar ferment is exactly what it sounds like: one glass jar of vegetables preserved with salt and time.
You are not building a fermentation shelf. You are not buying crocks. You are not committing to gallons of sauerkraut. You are learning one small preservation skill with food you can reasonably finish.
The easiest place to start is cabbage. It is cheap, forgiving, easy to pack tightly, and releases enough liquid to make its own brine. A small head of cabbage can become one quart jar of sauerkraut, which fits on a counter, then in the refrigerator, then into actual meals.
Fermentation becomes practical when it stays small enough to finish, eat, and repeat.
What You Need
You need one clean wide-mouth quart jar, one small cabbage, salt, a bowl, a knife, and something clean to press the cabbage down. A small glass, clean stoneware weight, or folded cabbage leaf can work. Do not overcomplicate this.
Use plain salt without anti-caking agents if you have it. Fine sea salt, kosher salt, or pickling salt all work. Avoid iodized table salt when possible because it can sometimes affect flavor and texture.
You do not need an airlock lid for your first jar. You do not need special weights. You do not need matching containers. You need vegetables held under brine long enough for the ferment to become pleasantly sour.
The Simple Ratio
Use about 2 teaspoons of salt for every pound of shredded cabbage.
That ratio gives enough salt to draw moisture from the cabbage and support fermentation without making the finished jar painfully salty. If you do not own a kitchen scale, use one small cabbage and 1½ to 2 teaspoons of salt. Taste after mixing. It should taste salty, but not like seawater.
How to Make a One-Jar Cabbage Ferment
Remove the outer leaves from the cabbage and save one clean leaf for later. Slice the cabbage thinly and place it in a bowl. Sprinkle the salt over the cabbage and mix it with your hands.
Let it sit for 10 minutes. Then squeeze and massage the cabbage until it softens and releases liquid. You do not need to be gentle. The goal is to bruise the cabbage enough that it creates its own brine.
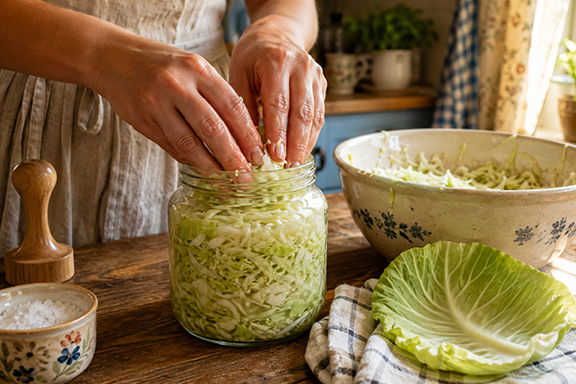
Pack the cabbage into the jar a handful at a time. Press each layer down firmly before adding the next. By the time the jar is full, brine should rise over the cabbage when you press it.
Leave about an inch of headspace at the top. Fold the reserved cabbage leaf and tuck it over the shredded cabbage to help keep the pieces below the brine. Add your weight if you are using one.
Set the jar on a small plate or saucer because active ferments can bubble over. Loosely cover it with a lid, cloth, or coffee filter. Do not seal the jar tightly unless you plan to burp it daily.
Where to Put It in a Small Kitchen
Put the jar somewhere you will actually see it but not knock it over. A back corner of the counter, a small shelf near the sink, or the top of the refrigerator can work if the temperature stays steady.
Avoid direct sun. Avoid the hot spot beside the stove. Avoid hiding it in a cabinet where you will forget it exists.
A one-jar ferment should not take over the kitchen. It should live in one contained place, do its work quietly, and move to the refrigerator when it tastes ready.
The best beginner ferment is not the most impressive one. It is the one you can start on your counter today.
What to Do Each Day
Once a day, check that the cabbage stays below the brine. Press it down with a clean spoon if needed. If the lid is on, loosen it briefly to release pressure.
That is the daily work. It should take less than one minute.
After three days, begin tasting. Some people like young sauerkraut at four or five days. Others prefer it after two weeks. Your kitchen temperature matters. A warm kitchen ferments faster. A cool kitchen takes longer.
When the flavor tastes pleasantly sour, move the jar to the refrigerator. Cold storage slows fermentation and keeps the texture better.
How to Know It Is Working
A working ferment usually smells tangy, sour, and cabbage-like. You may see bubbles. The color may soften from bright green to pale yellow. The brine may turn cloudy. Those signs are normal.
The texture should stay firm enough to chew. The flavor should become sour, salty, and alive.
If you see fuzzy mold, smell something rotten, or feel unsure about the jar, do not try to rescue it. Compost it and start again. One failed jar is not a crisis. It is part of learning a living process.
How to Eat One Jar Before Starting Another
This matters. The point is not to become a person with forgotten ferments collecting in the back of the fridge.
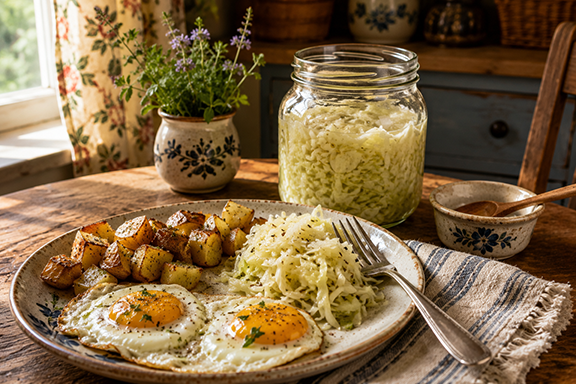
Use sauerkraut with eggs, potatoes, sausages, rice bowls, sandwiches, beans, soup, or roasted vegetables. Add it after cooking so the flavor stays sharp. A forkful beside a simple meal can make the whole plate better.
Do not start the next jar until the first one is nearly gone. That keeps fermentation from becoming clutter. It also teaches you how much your household actually eats.
The Best Beginner Variations
Once the plain cabbage jar works, adjust one thing at a time.
Add shredded carrot for sweetness. Add a little garlic for depth. Add caraway seed if you like a traditional sauerkraut flavor. Add thinly sliced onion if you know you will use it quickly.
Do not add six ingredients to your first jar. When a ferment turns out strange, you need to know what caused it. Keep the first few jars plain enough to learn from them.
Why This Counts as Homesteading
Homesteading is not measured by acreage. It is measured by useful skills practiced in real life.
A small kitchen can still hold real homestead skills when each skill earns its place.”
A one-jar ferment teaches preservation, patience, observation, food stewardship, and kitchen confidence. It turns a basic vegetable into something that lasts longer and feeds you differently. It does not require land. It does not require a cellar. It does not require a lifestyle performance.
It requires one jar and enough attention to finish what you started.
That is a skill worth keeping.
The Habit in One Line
Keep one jar of fermenting vegetables on the counter, check it once a day, and do not start another until the first jar is nearly eaten.