
Grinding Your Own Flour at Home: Grain Mill, Mixer Attachment, Storage, Soaking, and Grain Guide
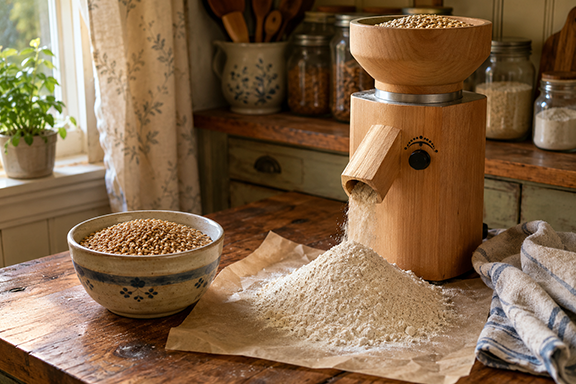
Have you ever considered grinding your own flour? My first experience was enough to send most people running to the hills. What a mess! My kitchen, my clothing and hair, and even my little dog, Izzy, were covered in flour. It took me a solid hour to clean up afterward. At the end of this post, I’ll tell you the secret of how to prevent that mess in your own kitchen!
So you might think I’d put that skill in the “never attempt this again” file. But I didn’t. Here’s why.
Grinding your own flour sounds like one of those kitchen skills that belongs to another century until you make the first loaf with flour that was wheat berries half an hour earlier. Then the difference stops feeling quaint. Fresh flour smells alive. It absorbs water differently. It makes bread, pancakes, muffins, crackers, and porridge taste fuller without needing extra ingredients.
That does not mean every household needs a forty-pound mill on the counter. A small kitchen can grind flour well with a dedicated grain mill, a mixer attachment, or a few lower-tech tools used honestly. The real question is not whether fresh flour is “better.” The real question is how often you bake, what you want to grind, how much storage you have, and whether you will use the flour before it loses quality.
Why Grind Your Own Flour?
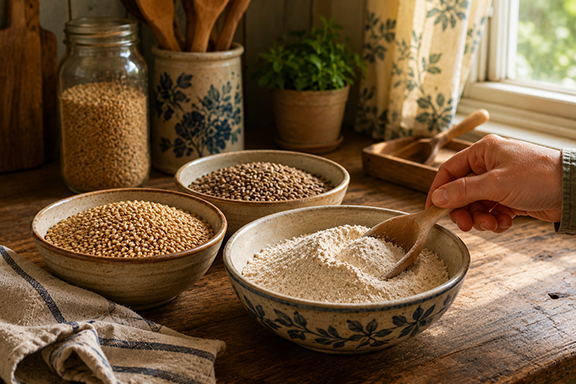
Fresh-milled flour gives you control over three things most store-bought flour takes away: freshness, grain choice, and grind size.
Fresh-milled flour is not just flour with a better story. It behaves differently because the bran, germ, oils, and starch are still newly exposed.
When grain gets milled, the protective bran layer breaks open and oxygen reaches the oils in the germ. That is why whole grain flour has a shorter shelf life than intact grain berries. The Whole Grains Council says intact grains can generally keep up to 6 months in a cool, dry pantry or up to a year in the freezer, while whole grain flours and meals generally keep 1 to 3 months in a cool pantry or 2 to 6 months in the freezer.
That shelf-life difference is the whole argument for grinding only what you need. Wheat berries, rye berries, spelt, einkorn, oat groats, buckwheat groats, millet, rice, and dried corn store better whole than they do as flour. Once ground, they need better storage and quicker use.
Fresh flour also lets you choose the grain for the job instead of using one bag of all-purpose flour for everything. Hard red wheat makes sturdy bread. Hard white wheat gives a milder whole wheat loaf. Soft white wheat works better for biscuits, muffins, pancakes, and quick breads. Rye makes dense, flavorful loaves. Spelt and einkorn bring tenderness but need a lighter hand. Buckwheat, oats, millet, and rice fill in for porridges, pancakes, flatbreads, and gluten-free blends.
Grain Mill vs. Mixer Attachment: Which One Should You Use?
A dedicated grain mill makes sense when you bake with fresh flour every week. A mixer attachment makes sense when you already own a compatible stand mixer and want to grind small batches without buying a separate appliance.
A dedicated grain mill usually gives more control, more consistency, and better long-term performance for regular milling. Most home mills use either stone burrs, steel burrs, or impact milling. Stone burr mills are common for fine whole grain flour. Steel burr mills often handle a wider range of dry grains and sometimes oily seeds depending on the model. Impact mills grind quickly but usually work best for dry grains, not oily nuts or seeds.
A mixer grain mill attachment, including KitchenAid-style stand mixer attachments, fits the practical middle ground. It stores smaller, costs less than many dedicated mills, and works well when you only need a few cups of flour at a time. The tradeoff is speed, heat, and motor strain. You should feed grain slowly, use dry grains only unless the attachment specifically allows otherwise, and avoid treating the mixer like a commercial mill.
For a small homestead kitchen, the decision is simple:
A home grain mill is best for regular bread baking; a mixer attachment is better for occasional milling and small batches.
Use a dedicated grain mill if you bake bread weekly, want fine flour, need consistent results, or plan to grind larger batches.
Use a mixer attachment if you bake occasionally, already own the mixer, have limited storage, and want fresh flour for pancakes, muffins, small loaves, or weekend baking.
Use a high-powered blender or coffee/spice grinder only for small amounts of soft grains, oats, buckwheat, rice, or seeds. These tools can make useful flour, but they usually produce uneven texture and heat up quickly.
Use a mortar and pestle, hand mill, or manual crank mill for emergency backup, coarse meal, cracked grain, or teaching children what grain actually is. Do not expect fine bread flour without effort.
What Fresh-Milled Flour Changes in Baking
Fresh-milled flour is whole grain flour unless you sift some bran out. That means it contains the bran, germ, and endosperm together. It also means it absorbs more liquid than white flour and often needs more rest time.
The most common mistake is swapping fresh-milled whole wheat flour cup-for-cup into a white flour recipe and expecting the same dough. Whole grain flour drinks more water. Bran pieces can cut through gluten development. The dough may feel sticky before it feels strong.
Start by replacing 25% to 50% of the flour in a familiar recipe with fresh-milled flour. For yeast bread, add a short rest after mixing the flour and liquid. Even 20 to 30 minutes helps the bran hydrate before kneading. For pancakes, muffins, and quick breads, let the batter sit 10 to 15 minutes before cooking or baking.
Fresh flour also has stronger flavor. That is good, but it means grain choice matters. Hard red wheat tastes hearty and assertive. Hard white wheat tastes milder. Einkorn can taste nutty and slightly sweet. Rye brings earthiness. Buckwheat tastes strong and can overpower a recipe if used heavily. Oat flour makes tender baked goods but needs support because it has no gluten.
Best Grains to Grind at Home
Whole grain flour spoils faster than intact grain because milling exposes the oils in the germ to oxygen.
Hard Red Wheat
Hard red wheat is the workhorse for whole wheat bread. It has strong flavor and good protein for yeast loaves. Use it for sandwich bread, rustic loaves, rolls, and hearty pizza dough.
Best uses: yeast bread, rolls, crackers, sourdough, hearty pancakes.
Small kitchen note: keep a small jar of berries in the pantry and the rest in the freezer or a sealed bucket if you buy in bulk.
Hard White Wheat
Hard white wheat gives you whole wheat nutrition with a milder flavor and lighter color. It is a good starting grain for families used to white flour.
Best uses: sandwich bread, rolls, tortillas, pizza dough, muffins.
Soft White Wheat
Soft white wheat has lower protein and works better for tender baking.
Best uses: biscuits, muffins, pancakes, waffles, cookies, quick breads.
Do not expect soft wheat to carry a tall yeast loaf by itself. Blend it with hard wheat or use it where tenderness matters more than structure.
Rye
Rye flour behaves differently from wheat because its structure relies less on gluten strength. It absorbs water well and benefits from sourdough fermentation.
Best uses: rye bread, sourdough, crackers, pancakes, crispbreads.
Use rye in smaller amounts at first. A 10% to 30% rye blend adds flavor without making dough too sticky or dense.
Spelt
Spelt is an older wheat variety with a sweet, nutty flavor. It can make beautiful bread, but its gluten structure is more delicate than modern hard wheat.
Best uses: muffins, pancakes, quick breads, lower-knead yeast breads.
Mix gently and avoid over-kneading.
Einkorn
Einkorn has a soft, golden flour and a distinct flavor. It absorbs liquid slowly and can feel sticky even when it has enough flour.
Best uses: pancakes, muffins, flatbreads, quick breads, lower-hydration loaves.
Do not keep adding flour just because einkorn dough feels tacky. Let it rest first.
Oats
Oat groats or rolled oats can be ground into oat flour. Oat flour adds tenderness but no gluten.
Best uses: pancakes, muffins, cookies, crumble toppings, blended gluten-free baking.
Use oat flour as part of a blend unless the recipe was built for it.
Buckwheat
Buckwheat is not wheat. It has a strong, earthy flavor and no gluten.
Best uses: pancakes, crepes, soba-style noodles, porridge, gluten-free blends.
Buckwheat has a higher oil content than many grains, so treat buckwheat flour like a short-storage flour. King Arthur notes that buckwheat berries have a shorter shelf life than many intact grains because of their oil content.
Corn
Dried corn can be ground into cornmeal or flour, but you need the right type. Popcorn, dent corn, and flint corn grind differently. Do not grind fresh sweet corn.
Best uses: cornbread, polenta, grits, tortillas if using properly prepared masa harina methods.
Most home grain mills handle dry corn, but check your mill’s manual before grinding large hard kernels.
Rice
White or brown rice can be ground into rice flour. Brown rice contains more oil and spoils faster after grinding.
Best uses: gluten-free blends, thickening, pancakes, rice crackers.
Millet
Millet grinds into a mild, slightly sweet flour.
Best uses: gluten-free blends, pancakes, muffins, flatbreads.
Use it fresh and in modest amounts because the flavor can become bitter when old.
Can You Grind Nuts?
Yes, but not in every mill.
Nuts contain a lot of oil. That oil can smear, gum up burrs, clog screens, and damage mills designed only for dry grains. Almond flour, hazelnut meal, pecan meal, walnut meal, and peanut flour-style grinds need different handling than wheat berries.
Use a food processor, high-powered blender, or nut grinder for nuts. Pulse in short bursts. Stop before the nuts turn into butter. For finer nut flour, chill the nuts first and add a spoonful of sugar or flour from the recipe to help keep the pieces separate.
Do not put oily nuts through a grain mill unless the manufacturer clearly says the mill can handle them. This matters more than optimism.
For storage, nuts need cold, sealed conditions because their oils turn rancid. UC Davis food safety guidance says nuts keep quality for a year or more at refrigerator temperature, 40°F or below, or up to 2 years in the freezer at 0°F or below, and shelled nuts should be packed in clean, moisture-free, odor-tight packaging.
What Not to Grind in a Grain Mill
Do not grind oily nuts or seeds in a dry grain mill unless the manual allows it.
Do not grind wet, sprouted, or soaked grain unless the mill was designed for wet grinding.
Do not grind coffee in your flour mill unless you want coffee-flavored flour and possible oil residue.
Do not grind sugar in a grain mill unless the manufacturer allows it.
Do not grind spices in your grain mill unless you want their oils and smell in the next batch of flour.
Do not grind grains with stones, chaff, or debris mixed in. Sort before milling.
How Fine Should You Grind Flour?
For bread, grind as fine as your mill can manage without overheating or struggling. Fine flour hydrates better and gives a smoother loaf.
For muffins, pancakes, and quick breads, medium-fine flour works well. Slight texture can improve the finished bake.
For porridge, cracked grain, hot cereal, and cornbread, a coarse grind is useful.
If your flour feels warm after grinding, spread it on a tray for a few minutes before sealing it. Warm flour trapped in a container can create condensation, and moisture is the enemy of flour storage.
How Much Flour Should You Grind at Once?
Grind what you will use within a few days if you want the best flavor.
For ordinary home use, a practical rhythm looks like this:
Grind 2 to 3 cups for pancakes, muffins, or quick bread.
Grind 4 to 6 cups for one or two loaves of bread.
Grind extra only when you already have freezer space and labeled containers ready.
This is where fresh flour fits naturally into a small-space homestead rhythm. The point is not to create another storage problem. The point is to keep grain whole until you need flour. That logic lines up with the Tiny Homestead Habits standard: repeatable, small-space friendly, and designed to remove friction rather than add a complicated system.
Storage Recommendations for Whole Grains
Intact grains store better than flour, but they still need protection from heat, light, moisture, pests, and strong odors.
For short-term use, keep a small working jar in a cool, dark cabinet. Use an airtight glass jar, food-safe bucket, or sealed container.
For longer storage, keep grains in airtight containers in the freezer if space allows. The Whole Grains Council gives a general rule of up to 6 months for intact grains in a cool, dry pantry and up to a year in the freezer.
For bulk storage, use food-safe buckets with tight lids, mylar bags, or sealed containers. Keep them off concrete floors, away from heat, and out of direct light.
Label every container with grain type and purchase date. A jar of wheat berries and a jar of rye berries look too similar when you are tired.
Storage Recommendations for Fresh-Milled Flour
Fresh-milled flour should not sit casually in a paper bag on the counter.

Store it in an airtight container. Keep it cool, dark, and dry. For best quality, refrigerate or freeze whole grain flour if you are not using it quickly. The Whole Grains Council recommends 1 to 3 months for most whole grain flours in a cool, dry pantry and 2 to 6 months in the freezer. King Arthur’s guidance is similar: whole grain flour keeps best in cold, dark storage, with freezer storage ideal because warmth and light speed oxidation.
Airtight storage matters because flour absorbs odors and moisture. Recent storage guidance from King Arthur experts also recommends airtight containers for flour and freezer storage for whole grain and nut flours because of their higher oil content.
Practical rule: if you grind it today and bake it tomorrow, the counter is fine. If you grind it this week and might forget it, refrigerate it. If you grind more than a week’s worth, freeze it.
Bring frozen flour to room temperature before baking when possible. Cold flour can slow yeast activity and change how dough feels.
How to Tell If Flour Has Gone Bad
Use your nose first. Fresh whole grain flour should smell clean, grainy, nutty, or grassy depending on the grain. Rancid flour smells sharp, sour, stale, waxy, musty, or like crayons.
Look for discoloration, clumping from moisture, insects, webbing, or mold. Do not salvage moldy flour.
If flour smells off, throw it out. The cost of a few cups of flour is not worth ruining a batch of bread. Check out a weekly kitchen rhythm that keeps food from going to waste.
Should You Soak Fresh-Milled Flour?
Soaking can help whole grain flour hydrate fully and may improve texture. It can also fit traditional preparation methods where flour, liquid, and time work together before baking.
Soaking fresh-milled flour works best when the recipe already has liquid, time, and acidity built into it.
The plain version: soaking means mixing flour with the liquid from the recipe and letting it rest before finishing the dough or batter. That liquid may be water, milk, buttermilk, yogurt, kefir, or sourdough starter depending on the recipe.
For pancakes, muffins, and quick breads, mix fresh flour with the recipe’s liquid and let it sit 30 minutes to overnight. Add eggs, leavening, salt, fat, and sweetener after the soak unless the recipe says otherwise.
For bread, use an autolyse or soaker. Mix flour and water, rest 20 minutes to several hours, then add salt, yeast or starter, and other ingredients.
For sourdough, the fermentation itself acts as a longer preparation method. Research on whole grains and phytic acid notes that sourdough fermentation can reduce phytate content through the grain’s own phytase activity when pH drops enough. A 2023 study also found that fermentation reduced phytic acid in whole grain flour, with larger reductions during longer fermentation.
That does not mean every grain recipe must be soaked or fermented. It means soaking and fermentation are useful tools, especially for whole grain bread, pancakes, porridges, and dense baked goods.
Basic Soaking Ratios
For pancakes or muffins, combine the flour and main liquid from the recipe until no dry flour remains. Cover and rest 30 minutes to overnight. If soaking overnight with dairy, refrigerate unless you are following a tested fermented recipe.
For bread, start with 75% to 90% of the recipe’s water mixed with the flour. Rest 20 to 60 minutes for a basic autolyse. Add remaining ingredients after the rest.
For cracked grain porridge, pour boiling water over cracked wheat, rye, oats, millet, or cornmeal. Cover and rest until softened, then add to bread dough or cook as porridge.
For sourdough, use your normal starter and fermentation schedule, but expect fresh-milled flour to ferment actively. Watch the dough, not just the clock.
Soaking Mistakes to Avoid
Do not soak flour and then forget to account for that liquid in the recipe.
Do not soak with baking powder or baking soda already mixed in unless the recipe was written that way.
Do not leave milk-based soaks on the counter for long periods unless you are using a tested cultured method.
Do not turn soaking into a rule that keeps you from baking. A loaf made with fresh flour and no soak still teaches you more than a perfect plan you never use.
A Small-Kitchen Workflow for Grinding Flour
Keep one jar of everyday wheat berries in the cabinet.
Keep backup grain in the freezer, bucket, or another cool storage spot.
Before baking, measure the grain you need.
Grind only that amount.
Let warm flour cool briefly if needed.
Mix the dough or batter.
Refrigerate or freeze any leftover flour in a labeled airtight container.
This keeps the habit small. No special flour inventory. No row of half-used flours going stale. No “homestead” project that eats the kitchen. Check out this simple pantry and kitchen rhythm checklist.
Troubleshooting Fresh-Milled Flour
My bread is dense.
Use more water, let the dough rest before kneading, or replace only part of the white flour with fresh-milled flour until you learn the grain. Hard wheat works better for bread than soft wheat.
My dough is sticky.
Fresh whole grain dough often feels sticky before the bran hydrates. Rest it before adding more flour. Over-flouring makes heavy bread.
My flour is coarse.
Run it through the mill again if your mill allows it. Try a finer setting. Sift out large bran pieces for lighter bread and use the sifted bran in muffins, crackers, or porridge.
My mixer sounds strained.
Feed grain more slowly. Use smaller batches. Let the mixer rest. A mixer attachment is useful, but it is not a dedicated grain mill.
My flour tastes bitter.
The grain or flour may be old, rancid, or poorly stored. Check the smell of the whole grain before grinding and the flour after grinding.
My pancakes are gritty.
Let the batter rest 15 to 30 minutes before cooking. Use a finer grind next time.
Best First Grains for Beginners
Start with hard white wheat if you want sandwich bread that does not taste too heavy.
Start with soft white wheat if you mostly bake pancakes, muffins, biscuits, and quick breads.
Start with rye if you already keep a sourdough starter and want deeper flavor.
Start with oats or buckwheat if you want small-batch flour without investing in a mill yet.
Do not start with ten grains. Start with one grain and three recipes. Learn how it behaves.
Is Grinding Your Own Flour Worth It?
Grinding flour at home is worth it when you will use the flour quickly and you want better flavor, better grain variety, and less dependence on bags of flour going stale in the pantry.
It is not worth it if you hate baking, have no place to store grain, or only need flour twice a year. In that case, buying good whole grain flour and storing it in the freezer makes more sense.
The best middle path is simple: buy a small amount of one grain, grind enough for one familiar recipe, and compare the result. Do not overhaul your kitchen. Make one loaf. Make one batch of pancakes. Make one pan of muffins. Let the flour prove itself.
How to Keep Flour From Going Everywhere
The first time I tried grinding my own flour, I did not feel like a competent homestead woman. I felt like I had lost a fight with a bag of dust. Flour coated the counter, my shirt, the floor, and somehow the dog. Fresh-milled flour is useful, but it is also light, clingy, and very willing to travel.
Most of the mess comes from three things: overfilling the hopper, letting flour fall too far from the spout, and opening containers too quickly after milling. Fix those, and the whole job gets calmer.
Set the mill or mixer attachment on a clear counter with nothing nearby that can catch flour dust. Put a wide bowl directly under the spout, not “close enough.” If your mill allows it, fit the bowl as close to the outlet as possible so the flour does not drop through open air. A deep bowl works better than a shallow one.
Do not fill the hopper to the top on your first few tries. Start with one cup of grain and learn how fast your mill feeds. If the flour backs up, slow down. If the machine sounds strained, stop and check the grind setting before adding more grain.
For mixer attachments, use the lowest practical speed recommended by the attachment instructions and feed grain steadily, not all at once. A stand mixer can sling fine flour dust if the bowl, attachment, or container sits even slightly out of position.
Keep a clean kitchen towel nearby. Some people loosely drape a towel around the receiving bowl and mill outlet, leaving room for airflow and safe operation. Do not cover vents or moving parts. The goal is to catch drifting flour, not trap heat or interfere with the machine.
After milling, wait a moment before moving the bowl. Fresh flour hangs in the air for a few seconds. Tap the side of the mill gently, let the last dust settle, then lift the bowl slowly. Pour flour into your mixing bowl or storage container with a scoop instead of dumping it from a height.
And shut the dog out of the kitchen until you are done. This is not a moral failure. It is basic flour management.
The best mess-prevention setup is simple: clear counter, deep bowl, short drop from spout to bowl, small batches, slow movement, and a towel ready before you start. Fresh flour should end up in your bread, not on every living creature in the house.
The Practical Bottom Line
Grind your own flour when freshness matters, but keep the system small. Whole grains store better than flour. Fresh-milled flour needs cold storage if you do not use it quickly. A dedicated grain mill suits regular bakers. A mixer attachment suits occasional bakers with limited space. Soaking helps with hydration, texture, and fermentation, but it should support your baking rhythm, not complicate it.
The old skill works because it is direct: grain in, flour out, bread on the table.
Do you like this kind of content? If so, you’ll probably LOVE The Homestead Blog Hop!
