
part 2: Sewing Inspiration for Fall
🍇 Project: Harvest Table Runner with Scripture Embroidery
Nothing sets a table like a handmade runner. For fall, I’m stitching one with a scalloped hem, appliquéd pomegranates, and Psalm 34:8 — “Taste and see that the Lord is good.”
This piece ties together autumn abundance with Scripture, making it a meaningful addition to both everyday meals and festival gatherings. Layer it over a neutral linen cloth, add candlesticks and a bowl of figs, and your table will feel both festive and rooted.
how to:
Supplies
2 yards of cotton or linen fabric (42–44" wide) for front & backing
Lightweight fusible interfacing (optional, for more structure)
Red and green fabric scraps for pomegranate appliqué (template included)
Fusible web (like HeatnBond Lite) for appliqué
Embroidery floss (gold or dark brown works beautifully)
Water-soluble fabric pen or transfer paper
Thread to match fabrics
Scissors or rotary cutter and mat
Sewing machine & iron
Scallop hem template (download included)
Scripture transfer guide (Psalm 34:8: “Taste and see that the Lord is good.”)- included
Cutting Instructions
Front: Cut two rectangles 16" × 32".
Backing: Cut two rectangles 16" × 32".
Interfacing (optional): Cut two rectangles 15½" × 31½".
Appliqué Pieces: Trace and cut pomegranates and leaves from scrap fabrics using fusible web.
Step 1: Assemble the Runner Body
Step : Assemble the rectangles
Sew the two front rectangles together along one short end with a ½" seam allowance. Press seam open.
Finished size: 16" × 63" (you’ll trim to 60").
Repeat with backing rectangles.
Layer interfacing on the wrong side of the front fabric (if using). Fuse in place.
Step 2: Trim to Size
Square up your front and backing pieces to 16" × 60".
Press both pieces well.
Step 3: Create the Scalloped Hem

Using the scallop template.
Draw a straight line across the width of your fabric. Pin the template on the link and trace around the template to create a stitching line.
Place front and backing right sides together.
Using the scallop template, trace scallops along both short ends.
Stitch around all sides with a 1/4" seam allowance, following the scallop curves at each end, leaving a 4” opening in one long side.

Cutting out the scallops
Cut around the scallops, using pinking shears or cutting notches on the curved edge. Clip into the corners, being careful not to clip through the stitches.
Trim excess fabric and notch the scallops
Turn right-side out through the opening. Press well.
Topstitch ⅛" around entire runner to close the opening and secure edges.

Step 4: Add the Pomegranate Appliqué
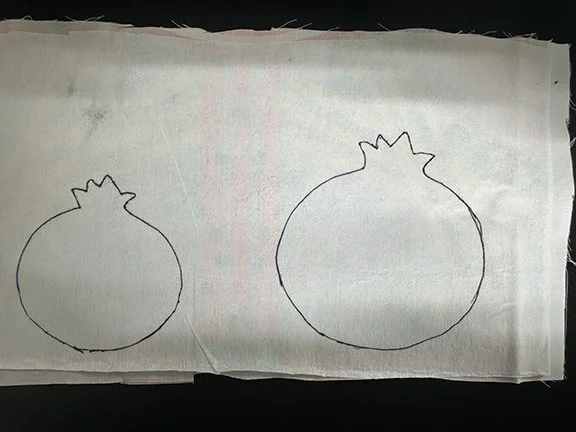
Trace pomegranate shapes onto fusible web. Fuse to fabric scraps, then cut out shapes.
Arrange appliqués at either end of the runner or over the center seam to disguise it.
Fuse in place with iron.
Finish edges with:
Machine: Narrow zigzag or satin stitch.
Hand: Blanket stitch with embroidery floss.
Step 5: Embroider the Scripture

Print the scripture transfer guide.
Transfer the verse along the center of the runner (or one long side).
Embroider over the letters using backstitch, stem stitch, or chain stitch.
Suggested verse: “Taste and see that the Lord is good.” (Psalm 34:8).
Step 6: Finish & Style

Give the runner a final press.
Place it down the center of your table.
Style with candles, figs, grapes, or autumn greenery.
Tips & Variations
Shorten length to 42" for a centerpiece runner with no piecing.
Piece multiple fabrics for a striped or patchwork runner.
Switch motifs seasonally — pumpkins, grapes, or olives.
What I did differently. First, let me say that I used leftovers from earlier projects. Since I didn’t have the required fabric amount, I shortened my project to a finished length of 52” and only 12” in width. Also, I folded my fabric in half lengthwise, so it was “self-backed.”
Other than that, I followed the instructions as I designed this project.