
Simple Beeswax Tealight Candles for Spring Evenings and Sabbath Rest

Spring is a lovely time to hand craft your own beeswax tealights, and it’s so easy!
Spring has a way of stretching the day just a little longer, softening the edges of evening and inviting us to linger. It is the season where light matters again—not just for seeing, but for gathering.
A small flame on the table changes a room. It slows conversation. It draws people in. It marks a moment as set apart.
Beeswax candles carry something more than light. They smell faintly of honey and warmth, as though the work of the hive still lingers in them. They burn clean, steady, and bright—simple, honest light.
This is not a complicated craft. It is the kind of thing you can make in an afternoon and use that very evening.
And that matters.
Because the goal is not just to make something. The goal is to use it.
Why Beeswax?
Beeswax burns longer and cleaner than paraffin. It doesn’t carry the chemical scent of store-bought candles, and it produces a warm, golden light that feels alive rather than artificial.
It is also one of those materials that connects you back to real processes—bees, work, patience, gathering. It belongs in a homestead rhythm.
What You’ll Need
Beeswax (pellets or small blocks)
Cotton wicks (pre-tabbed for tealights works best)
Tealight cups (metal or reusable molds)
A heat-safe jar or double boiler
A small pot for simmering water
Clothespins or chopsticks (to hold wicks centered)
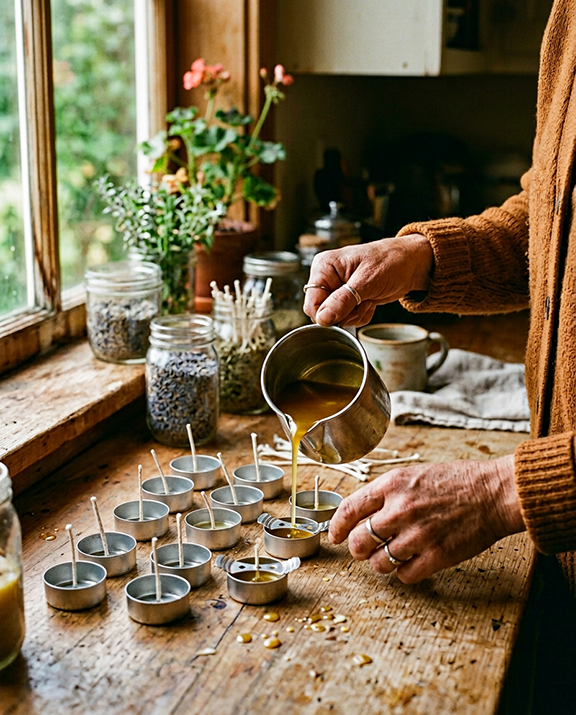
Step-by-Step Instructions
1. Melt the Beeswax
Place your beeswax in a heat-safe jar and set it into a pot of simmering water. Let it melt slowly. Do not rush this—gentle heat keeps the wax clean and usable.
2. Prepare the Cups
Set your tealight cups on a flat surface. Place a wick in the center of each one. Use a clothespin or chopstick laid across the top to keep the wick upright.
3. Pour the Wax
Carefully pour the melted beeswax into each cup. Fill just below the rim.
4. Let Them Set
Allow the candles to cool completely at room temperature. This takes about 1–2 hours. Avoid moving them while they set.
5. Trim the Wick
Trim the wick to about ¼ inch. This helps the candle burn evenly.
A Simple Way to Use Them

Use your homemade candles to light your Shabbat table!
Do not save these for “special.”
Light one while making dinner.
Light one when you sit down with a book.
Light them at your Sabbath table and let them mark the transition from ordinary time to set-apart time.
This is where the craft becomes something more than a project.
It becomes a practice.
A Gentle Upgrade (Optional)
If you want to take this one step further, try pouring the wax into small ceramic or glass containers you can reuse each week. A dedicated set of Sabbath lights, made by your own hands, carries a quiet kind of weight.
Closing Thought
Spring reminds us that light returns, but it also asks us to notice it.
A candle is small.
But it is enough to mark a moment.
And sometimes, that is exactly what we need.